

Defeat From Victory
Again and again during the Anglo Boer Wars in South Africa, the British troops were able to quickly and effectively turn hard fought tactical victory into strategic defeat. A perfect example was the Battle of Elandslaagte, fought on 21 October 1899, during the Second Boer War.
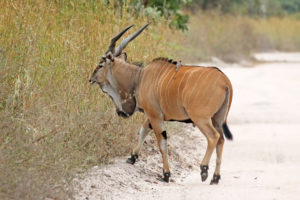
For context, an eland is a massive antelope, standing about 1.6 meters tall at the shoulder and weighing just under 1,000 kg. It is native to Southern Africa and has been both hunted and domesticated by a number of African tribal groups. The laagte is a wide and level valley in the African veld. It comes from the Afrikaans word “low.”
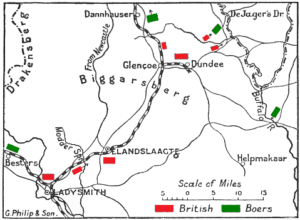
In October 1899, Elandslaagte was a railroad station and farm between the strategic towns of Ladysmith and Dundee, in Natal, British territory. A British force was bivouacked in Ladysmith defending the city and providing support to a British detachment in Dundee.
Elandslaagte Battlefield stands largely unchanged today. The heights where the Boers dug into their positions, as well as the broad front where the British Infantry charged remains almost as it was 120 year ago. There are gravestones and small monuments – they mark positions where British soldiers and Boer burgher fought and died. Tourists and amateur historians can freely follow the paths the British attackers used and stand in the positions where the Boer defenders fell to understand what happened there. Battles are described in words which can be read, but fought over ground which must be tread.
The war was fought over the most African of issues – voting and gold. The British demanded votes for English-speaking British subjects living in the Transvaal and Free State Boer Republics; voting had previously been reserved for Afrikaans speaking Boers only. A large number of British had swarmed the Boer Republics starting in 1886, with the discovery of golden Witwatersrand, and came to outnumber the Boers. Boer leaders were concerned that giving the British in the Republics the vote might lead the Republics being absorbed into the British colonies in the area, an idea that horrified the Boers, who had fled the British colonies generations before. Negotiations were held, abandoned, renewed, demands were made, and the fragile peace finally collapsed in September 1899.
The start of the Boer invasion of Natal on 11 October 1899 surprised the British. Small mobile Boer units were able to surround British garrison towns and besiege them. In an early phase of the advance, 1,000 Boer soldiers and foreign volunteers under the command of General Johannes Hermanus Michiel Kock broke through to Elandslaagte, capturing the station, and cutting the telegraph link between the British main force and the Detachment in Dundee on 19 October 1899. Kock was a German speaker, and commanded a German Corps as well as Afrikaans-Speaking Boer units from the Johannesburg Commando. Kock also had several small field guns, which has been captured from British Colonial Police that had invaded Boer territory in 1885.
The British force was commanded by Major General John French, leading Cavalry Squadrons, and Colonel Ian Hamilton, arriving shortly afterward by train, leading Infantry units. The British used standard tactics – cavalry scouting and harassment, and then an artillery bombardment followed by a slow infantry charge, and a double flanking maneuver by highly mobile cavalrymen. What French and Hamilton did not know is that their efforts were already in vain. On the day before, 20 October 1899, the British detachment at Dundee had won a tactical victory at Talana Hill, but was about to retreat because they had been cut off from their water supply.
The British were equipped with superior infantry weapons – Magazine Lee-Metford (MLM) bolt action rifles holding 10 bullets. The rifles were brand new, and had double the range – over 700 meters, of their Martini-Henry predecessors. However, the MLM was so new that tactics had not evolved to use it effectively, so British soldiers mostly just advanced in tight formation, firing at the enemy. Notably, Elandslaagte was a deviation from this tight formation advance, and probably won the day. However, it was not adopted during the rest of the Second Boer War, and British troops in other battles returned to fighting in a tight formation and getting slaughtered by accurate rifle fire. The Boers also had good weapons, Mauser M1895s with a 5 round internal magazine and a range of over 500 meters, but during the war, Boer tactics using their rifles were better; had the Boers not switched to M1895s and stayed with their Westley Richards rifles from the First Boer War, even tactics would have lead to their defeat in short order. However, the Boers had their M1895s, understood cover and concealment, scouting and tactical withdrawal – they could more effectively employ their short-range rifles against British units. In the end, during the Battle at Elandslaagte the Boer riflemen were simply outclassed by superior British artillery and cavalry, and were hampered by the poor performance of some of their foreign Hollander allies.
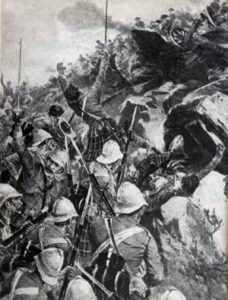
At Elandslaagte, the British artillery guns bombarded the Boer positions while Hamilton’s infantry charged. The British infantry were briefly pinned down by rifle fire from Boer M1895s, but when an afternoon storm struck, impeding Boer marksmen’s visibility, the famed Gordon Highlanders and Manchester regiment charged and broke the Boer lines. Kock led a counterattack, but failed and fell to British fire. The Boers retreated right into the path of the encircling British Cavalry, who cut them down with sword and pistol, and re-captured the formerly British field guns. Before nightfall, the battle was over and the British controlled the field. That famed cavalry charge would later enter British military folklore as “Ell and Slaughter” due to its effectiveness.
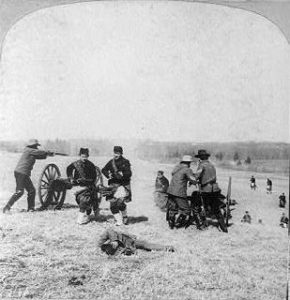
And yet, with this tactical victory came a cost too high to bear and hold the field. The British lost 22 officers, including Commander of the Light Horse Lieutenant Colonel John Scott-Chisholme. He fell while leading a Cavalry charge and waving a red scarf. The Gordon Highlanders lost their commander Lieutenant Colonel Dick-Cunyngham to Boer rifleman as well. The other officers were killed because of their uniforms – although the British had adopted a semi-camouflaged tan uniform for their troops, their officers still wore distinctive emblems and carried swords, allowing the superior Boer marksmen to pick them off at range.
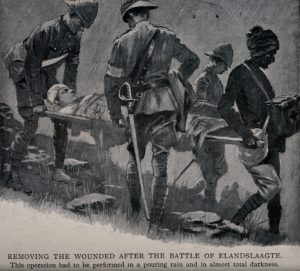
The final insult came from British Lieutenant General Sir George White. Sir White was concerned that Boer troops from Orange Free State would attack Ladysmith, which was a more important strategic point than Elandslaagte. French and Hamilton were forced to withdraw, and the Boers reoccupied Elandslaagte two days later. The detachment at Dundee which French and Hamilton were sent to save were cut off from easy retreat on the railroad. They were forced to march over rough ground, leaving behind their wounded to be captured.
Interestingly, both French and Hamilton would rise to prominence later in military history – but not in a positive light. French led the ill equipped British Expeditionary Force (BEF) into continental Europe to participate in the Great War in 1914 and Hamilton commanded the disastrous Gallipoli Campaign against the Ottoman Army in 1915.
- June 2, 2020
- South Africa